How to Sew a Baby Receiving Blanket (+ DIY Bootie Sole Inserts)
Would you like to make a thoughtful, handmade gift? Learning how to sew a baby receiving blanket is a perfect beginner sewing project. Soft, practical, and easy to customize, baby blankets are wonderful for newborns, baby showers, and everyday use.
In this tutorial, I’ll walk you through simple steps for sewing a cozy receiving blanket, along with how I made DIY bootie sole inserts to add extra comfort to baby booties. With basic sewing skills and helpful tips, you’ll be able to create beautiful baby essentials with confidence.
I have been working on new sewing projects. If you need something else, see all our sewing for baby. My oldest daughter's baby is due in May. Along with the projects, I am sharing the patterns and books I used. Hopefully, when it comes time for you to think about making gifts for your baby, grandbaby, ormaking handmade baby shower gifts, these sewing projects and resources will help you.
How to Sew a Baby Receiving Blanket
Why do I love sewing projects like this?
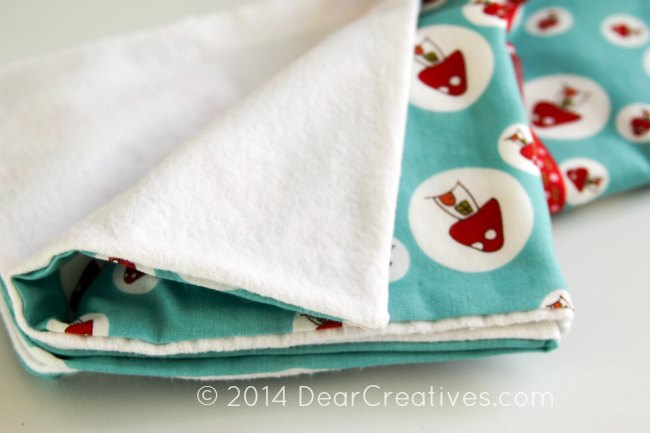
- They don't need a lot of fabric: For receiving blankets, you only need two pieces of fabric, or you can make them out of a single piece of flannel for a layered blanket. Typically, they are about 30 inches x 30 inches, but they can vary in size.
- All straight stitching: Makes this easy enough for beginning sewers.
- They make great handmade gifts: Coordinate fabrics with the nursery or the time of year the baby is born.
How to sew a baby receiving blanket, let's get started!
Materials Needed for a Baby Receiving Blanket
- Two cuts of fabric: 30 inches by 30 inches or 36 inches by 36 inches.
- Type of fabric: Flannel or Flannel and Minky
- Coordinating Thread
- Sewing Scissors
Preparing & Cutting the Fabric
- Prewash the fabric and dry it according to manufactorers recommendations. Measure and cut the fabric. Make Sure the fabric is square.
Step-by-Step How to Sew a Baby Receiving Blanket
- Take both fabric pieces and put them right sides together.
- Pin around the area to be sewn. Leaving a gap for turning the fabric (in the middle of one side). I mark the opening for turning with two pins on either side of the opening. This helps knowing when to stop and start. Opening size is about four-six inches.
- Start sewing from the marked opening section and continue around all sides, stopping at the other opening side.
- Turn the Fabric: You need this to be able to pull the top (right side) out and then finish the blanket. Next, trim corners.
- Sew the turn opening closed. And sew the opening by handstiching. Or the alternative method is to do it if you top sew the blanket.
Finishing the Blanket
Optional: Top sew the baby blanket (all around four sides, closing the opening) close to the edge of the blanket. Use the video below as a resource.
Video for Sewing an Easy Baby Blanket
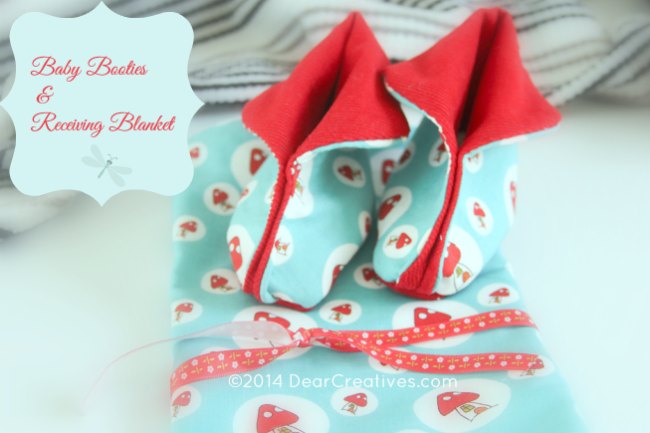
I made this receiving blanket to match the booties. And I had just about the right size fabric left over. The fabric I used was a white flannel for the second layer. Receiving blankets are typically a nice thin layer of flannel or two. I picked cotton for the top/outer layer as the baby is due in May. These are great beginning sewing projects, as it's all straight stitching. The booties are more for intermediate sewers.
DIY Baby Bootie Sole Inserts
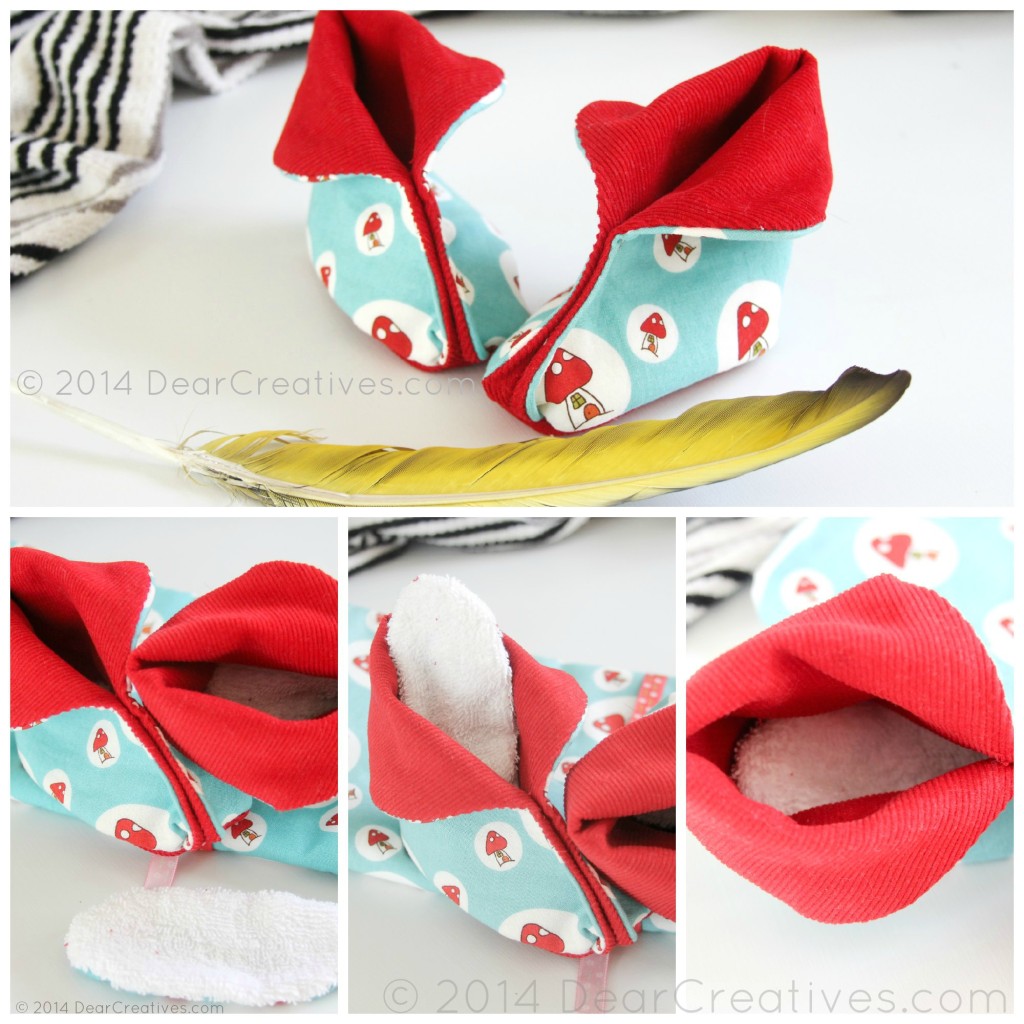
You can see how these booties were made and the pattern/book I used. See the full baby booties tips here: Moon Booties: Baby Booties.
The inserts didn't come in the pattern. Here is how to make a pair
Steps for making the baby bootie Inserts
- To make the pattern: Trace the bottom of the booties' shape and then cut out a piece of cotton plus a piece of terry cloth for each shoe (two of each fabric, 4 pieces total).
- Do this step for each insert: With right sides together, sew aroundthe oval shape, leaving a 2-inch space for turning.
- Turn the sewn side to the inside, pulling out the right sides, then sew them together by hand to finish them off. Hope that makes sense, they are super easy to make.
- Insert into the baby bootie/shoe.
What I liked about making the insert is that it leaves a clean finished look to the bootie. As the child grows, you can pull them out to extend the size of the shoe. Win, win.
FAQ: Sewing a Baby Receiving Blanket
What fabric is best for a baby receiving blanket?
Soft cotton flannel or jersey knit works well because it’s breathable and gentle on a newborn’s skin.
Can I use fleece or minky fabric for this blanket?
These fabrics can work. Take note that the Minky is a stretchier (knit) fabric, which makes it slightly harder to sew. Pin the fabric well and consider using a walking foot for even stitching.
What size should a baby receiving blanket be?
Most receiving blankets are between 30” x 30” and 36” x 36”, but you can adjust the size as needed.
Should I prewash fabric before sewing baby items?
Yes. Prewashing prevents shrinkage and ensures the blanket is soft and ready for gifting.
Can beginners sew a baby blanket?
Absolutely. This project uses straight seams and basic techniques, making it ideal for new sewists.
Additionally, there are swaddle blankets, which are similar to receiving blankets; you wrap the baby slightly differently, like wrapping a burrito. Those blankets are slightly larger in dimensions for wrapping. If you are on a budget, here is a free baby shoe pattern and YouTube tutorial.
- New here? Be sure to Subscribe.
- Pin it for Later
- Follow us on Pinterest
- Shop our favorites on Amazon
More tutorials for how to sew a baby receiving blanket
- Receiving Blanket Tutorial 2-layer via Blissfully Domestic
- Receiving Blanket Instructions via E-How
- Receiving Blanket Tutorial 1 single layer via Blue Cricket Designs
- Free Receiving Blanket Pattern via You Can Make This
- Self-Binding Swaddle Blanket Tutorial via Tea Rose
- Free Swaddle Blanket Pattern via MakeZine (love this one! I can't wait to try it & share it with you!)
Sewing For Baby
- Sewing Patterns and Book that I am using. Lots of easy projects for a baby!
- Baby Burping Cloths
- Browse all of our latest sewing tutorials for more ideas.
- Sewing Projects you might like! Kid's Tote Bag.
- Sewing for Home
What kinds of sewing projects are you working on?


One Comment
Comments are closed.