Re-Purposed Pottery Barn Chairs – Part 2 + #Diy Tutorial
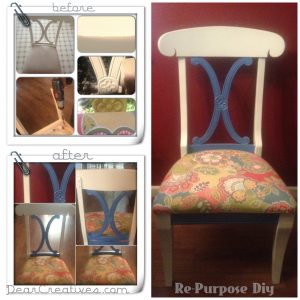
Re-purposing of the Pottery Barn Chairs I found at the flea market was a project I was excited to do! These chairs have great bones and typically are so expensive to purchase new. The run down of items needed and the costs it took to do this project are listed below. Don’t forget to check the other two posts packed full of helpful links for planning along with tips for when you are ready to re-purpose or re-upholstery your chairs. Today I am sharing my tips of how I re-purposed two older Pottery Barn chairs.
It isn’t hard you just have to take time when it comes to spraying the chairs with spray paint. An even distance of short sprays while moving your hand back and forth is needed. Wait between spraying times for the paint to dry completely for second coating and if you are taping off sections and painting with more than one color. I hope to take the chairs outside for better photos when they are 100% done. I may just add a pop of color to the center flower.
Click to Enlarge
Total Cost: $61.60 for both / $30.58 ea (+3.99 if I use the summer squash spray paint color. We own the tools, painters tape & had the sandpaper)
In comparison retail prices on sale are $229-279. on new Pottery Barn chairs. At the low end 2 Pottery Barn Chairs would of been $458. total!
My cost $61.60! A total savings of $396.40
Now how to get the same results? First find yourself some sturdy chairs in need of some tlc, make sure there are no cracks & breaks in legs or elsewhere. Bargain for the deal!! I can’t wait to paint the daisy center & photograph the chair in proper light. Now here’s the diy:
DIY Supplies Needed for the Pottery Barn Chairs:
- Screwdriver with long bit
- Staple Gun & Staples
- Painters Tape
- Sand-Paper 220 grit
- Spray Paint- I used Rust-Oleum Painter’s Touch (Ultra Coverage 2x) This product bonds to plastic . wood. metal indoor-outdoor & fast drying
- Colors: Stain-heirloom white & Satin-wildflower blue $3.99ea
- Satin-summer squash for center daisy is yet to be applied & will be done by hand, not spraying due to wood design.
- Fabric – Joann’s Fabrics @ 50% off cost $13.18 (2 yards @ $6.59 )
- Chairs- 2 bought at flea market for $40.
Directions and steps for Re-Purposing Chairs:
- Take off the seat by flipping over & unscrewing
- Clean the chairs
- Sand them!! & wipe off dust
- Decide what color(s) to use
- Paint the back & intricate parts first allow to dry completely! I am talking over night!!
- Use newspaper and painters tape off that dried area & paint the rest of your chair the second color & let dry completely! On certain parts I used a hard postcard to block paint spray onto intricate areas
- Fix chair pad if needed
- Cover chair seat with material, make sure pattern is where you want it & smooth out for no wrinkles pin along sides to keep in place
- Flip over cushion leaving at least a 2″ or more cut excess material, hem then fold under seam & staple
- Staple fabric to chair’s underside (use caution & take your time) & then remove pins from side of chair cushion
- When chair is done with painting process set seat back into place screwing seat to chair
That’s it your done! I hope you can find something to re-purpose & grab some diy savings!!
Part 1 with links to more helpful tutorials! (great tutorials I found from other sites & before/after’s)
What have you re-purposed lately?
If you re-purpose chairs any time be sure to drop by and share them at my weekly party!


Great job! They look really good.
Thanks Patricia! I’d like to get a better photo to share, but will probably have to drag them outside, lol. Our house is a bit dark which is only good due to the heat we get here outside, it keeps it cool indoors, but for photographing it is a challenge! Can’t wait to visit & see your fall wreath! Be sure & join the link up if you like!
Is there a way to repair them well if there are cracks in the wood? Just curious if you have tips for that… This is great, thank you for sharing!
Someone asked about fixing cracks: Yes, it depends on the crack if it is a small crack that hasn’t stressed the chair to make it unsafe to sit in then a simple wood putty & letting it dry then sanding might work just fine. Here is an article: http://www.woodmagazine.com/woodworking-tips/techniques/home-improvements/furniture-crack-repair/ & then if its a bit more complicated this article might help http://www.instructables.com/id/Fix-Cracked-Wood/#step1
Pottery Barn prices are outrageous! Its great that you were able to come up with a DIY :)) Thanks for linking this post up with my NO RULES Weekend Blog Party!
Have a great weekend 🙂
Paula
lifeasweknowitbypaula.blogspot.com
Hi Paula, I know so when I saw the chairs at the flea market I had to bargain & grab them. Thanks for stopping in & taking the time to comment.